|
Monday,
June 5th, 2006
I
went to JoAnn’s today after looking through my list of costumes I wanted to try. There were a few that I liked on my
list more than others, but I thought I’d just go and sift through patterns and decide there. Well, sure enough, I found a pattern that looked like it would be fairly easy to adapt to Eowyn’s
White Wool costume and that was Butterick 4827. Unfortunately, it doesn’t
have the bell sleeves, but I can figure that out, right? And, it has a lace-up
back and princess seams. The original gown in the movie does not lace up, but
I figured, why not? And the princess seams will be good for my figure…I’m
a bit more big on the top than Miranda…
So,
I went looking through the shop to see if I could find fabric for less than $5 a yard for the main dress fabric. I figure I’ll need 3 kinds of fabric: one for the “wool” part, one for the lining of
the dress, and one for the lining of the sleeves. I found some strange linen-like
fabric that looked pretty good, and at 2.99 a yard, perfect price. I got some
extra from what the pattern called for to help with the sleeves. I got my little
grommets and grommet tool, but couldn’t find cording I liked for the back lacing.
I figured I’d come back for the lining stuff because I wasn’t sure what I had at home for fabric.
I got home and looked through my fabrics…not very much for lining stuff.
So, I’ll have to go back. And I have to start thinking about how
I’m going to do those sleeves. Hmm...
Wednesday,
June 7th, 2006, 4:00
pm
I
washed my linen-like fabric and it looks fabulous. It doesn’t look true
to screen, but it’ll be close enough for my project. I took some screen-caps
last night and I think I’m good with pics now. Alleycatscratch has been helpful as well as Costumersguide.com.
I
began thinking about the sleeves. I looked at one of the pictures I have (from
the costume reference pictures) and started drawing a picture of it. I measured
from my own arm to my knee and pulled the sleeve pattern out from the Butterick 4827 envelope.
I found some tissue paper that I have stowed away and taped it up together to make it bigger. I found some graph paper and drew a little itty bitty sleeve based on the dimensions of the sleeve pattern
in the envelope. I cut out my little version and taped it together to see how
it would work as a sleeve. It’s quite cute.
Anyway, I cut away at it until I liked what I saw. I then used my math
skills (which are very little) and made it to size on my huge tissue paper. I
cut that out and there is my sleeve pattern. I hope it works. I haven’t tried it yet.
I
figured that I’d want to have all the fabric pretty soon, so I decided to run to the fabric store again. I figured out how much lining I’d need for my new sleeve and the dress itself. I figured out how much cording I’d want as well. I got
to the store and found everything I wanted right away. I found a great fabric
for the lining of the sleeves…a silky polyester that was only 3.99 a yard. (I
might have to tea-dye it, though…it’s a tad bit yellow compared to my cream-colored linen.) I found some pretty good cording for the trim on the sleeves and collar.
And I bought silver and gold embroidery thread for the embroidery on the collar and belt. I also found some close (but not perfect) trim for the sleeve ties.
The sleeve ties on the original were just braids. The stuff I found isn’t
quite braids, but I think it’ll work pretty well.
Now
I have to figure out how to embroider….I bet my mother will be amazed that I’m going to try this…
Wednesday,
June 7th, 2006, 11:30 pm
Well,
I dyed the lining fabric. I tested a strip of it first and it didn’t get
dark at all. It was still its yellow self.
I was disappointed…but I did not give up! I tested again with more
tea. And longer in the tea. That
was better. So, I just went with it and let it sit there. It’s now hanging in my bathroom drying. It looks tons
better than that yellow it started out as, but we’ll see what happens. While
I was dying that, I dyed the cord for the back lacing. That worked just perfect
right away.
I
laid out all my pieces with my modified sleeves and cut them. I’m going
to wait until I’ve sewed the front pieces together to finalize the V-neck. Since
I’m using a pattern with princess seams, I have to make sure the whole neck is the right v, instead of just the middle
piece…that would look silly. I had plenty of fabric, but not enough to
re-do any of the long dress pieces, so I hope those are ok for the V neck modification.
Eek.
I
had emailed my mother about my project, and she has now sent me a total of 4 emails with tips and questions….since I
checked my email this afternoon. And she suggested that instead of embroidering
all the stuff on the collar that I use beads instead. Something to consider…
Grr,
I just realized that I don’t have enough fusible interfacing to continue…
Off to the store again tomorrow…
Ooo,
just checked my dyed fabric and it’s great. Love the color and texture. Even though it doesn’t look very much like the fabric used in the dress, I think
it’ll look pretty good.
Thursday,
June 8th, 2006, 12:45 pm
I
am so awesome. I dug through my fabric tote and sure enough, there was just enough
fusible interfacing to do the dress. I don’t have enough for the belt,
but I figured that if I was going to embroider it, I better do it before I back it, right?
We’ll see…
So,
now I have to figure out how to line something. I think I just make the dress
in reverse, right? Well, without the lacing part.
I’ll think on it. But, first…the dress…
Thursday,
June 8th, 2006, 3:00
pm
My
second seam I had to rip out. I suck.
Thursday,
June 8th, 2006, 10:00
pm
The
dress is ready for sleeves now. I put
together the outside of the dress and went ahead to cutting out the lining. I
didn’t have enough to make the pieces as long as they needed to be, so I chopped them in half and hope that there won’t
be a huge line running through the middle of the dress. Here’s to hoping… I also just winged the collar and it turned out just fine, though I snipped something
I shouldn’t have. Now I have to trust the lining to fix that problem.
I
also cut out the remainder of the sleeves that I needed. There will be a total
of three layers in this sleeve, the linen, the liner, and the under sleeve. I
hope they’ll all fit in the seam. We’ll see… I also worked on how the under sleeves are tied. I think I
have some cream-colored twill tape that might just work for the little tie-rings. They’ll
have to go in the seam and in a mini seam that I’ll have to sew about an 1 ½ “ away from that.
I
started working on ideas for the belt. I might be able to find gold trim that
I could use for the half circle parts, but I will have to figure out what to do for the silver medallions. I don’t really want to use clay or plastic. I was hoping
I could just use the same embroidery techniques used on the dress collar. I dunno…I’ll
keep thinking.
Tomorrow,
I’ll put together and line the dress. And I hope to get started on the
sleeves as well. After tomorrow, I won’t have nearly as much time to work
on it as I did this week.
| My Eowyn: early June, 2006 |

|
| Here's the start to my dress. I need to iron it, but it looks alright. |
Friday, June
9th, 2006, 4:00
pm
It’s
funny. While I’m ironing the dyed fabric, it smells like tea. Ha.
I
started off this morning by sewing together the lining. The inner sleeves will
be interesting and I’m not sure if I like them that much. I might need
to line those as well, but I’m not sure I want all those layers. The silky
lining is pretty thin, though. And I really don’t like how my inner sleeves
turned out. They are yuck. I’ll
just do what I know I should…
| My Eowyn trial inner sleeves |

|
| This is the first trial for the inner sleeves. Ick. |
Friday, June
9th, 2006, 6:30 pm
Sleeves: much better. I re-cut them out of my remaining silky stuff and I found
some scraps of muslin that were just big enough to line them with. They now look
like I envisioned them, so that’s good. And they’ll feel better on
my arm, too. I have put in one row of ties with my twill tape and they look pretty
good. I have to decide how far away the second row will be now.
My
new dilemma is the outer bell sleeves. I bag-lined them and I’m not sure
I like how they are hanging, but I haven’t tried to iron them yet. I’m
sure that’ll make them look better. I think I didn’t make them quite
big enough. But, I don’t think that will bug me much right now.
| My Eowyn inner sleeves |

|
| Here are the sleeves I ended up with. I lined the fabric, so it looks much nicer. |
Friday, June 9th,
2006, 7:00
pm
Yes,
that helped, but maybe I could sew the lining to the seam allowance then add the trim?
Or maybe I’ll just wait till I get the trim and try to see if that really does make it look better. It would have been nice to put the entire dress together tonight, but I’m not sure that’s going
to happen. I suppose I’ll have to wait until Sunday or Monday.
| My Eowyn bell sleeves |
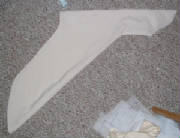
|
| This is the basic shape of my bell sleeves. I should have made them a tad bit bigger. |
| My Eowyn bell sleeve: inside |
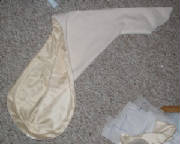
|
| Here you can see the lining fabric. |
Friday, June
9th, 2006, 9:30 pm
Ok,
I can’t sew anymore because I live in an apartment building and I don’t want to disturb our neighbors. I probably could go till 10, but I don’t have any projects small enough to do. Once I get going…
The
inner sleeves look fabulous. I really really like how they are turning out. The little ties are so elegant. Now I
have to see if my back lacing stuff will work for that or if I should get other stuff.
It looks like (from the picture) they used the same stuff as they used to trim the dress. I’m not sure if I will use that or not. Though it was
really cheap…
I
need to finish the bell sleeves and attach the sleeves and lining to the dress. The
belt will need to be constructed, but I’m not sure if I should do the embroidery stuff first. A nice project for summer. :)
| My Eowyn inner sleeve inside |
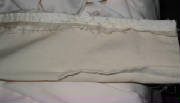
|
| Here's how I did the row of loops. One row is in the seam and the other, I put a small seam 3" away |
Sunday,
June 11th, 2006, evening
I
ironed up and pinned my bell and inner sleeves. I got started pinning them to
the dress with the lining. I got annoyed with trying to fit all that fabric in
one place so I had to stop. I’ll try again tomorrow when I’m more
fresh.
Monday, June 12th, 2006, 9:30 pm
I
got the sleeves on just fine. I thought
it was going to be all hard, but it turns out that it was actually quite easy. The
thin silky stuff was just fine and it didn’t bunch or get annoying. They
look pretty good and I did a mini-fitting. The sleeves will be tight, but I kinda
figured they would be. So, everything is just fine.
I
put together the bands for the lacing and put the grommets in. That took a tad
bit longer than I thought it would, but they turned out just fine. I don’t
have that big puncher thing to help, but my hammer and tiny tool worked just great.
I’ll pin them the bands to the back and sew them in when I have my next day off.
Grr…
I just noticed that I put the grommets in the wrong way on one of them, so they both go the same direction… Well, too bad.
| My Eowyn dress back with lacing |
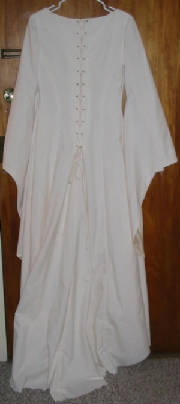
|
| Here's the non-true-to-screen back lacing. I just couldn't resist. |
| My Eowyn dress with sleeves |
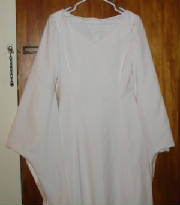
|
| Here's the dress now with sleeves and lining. |
| My Eowyn sleeves |
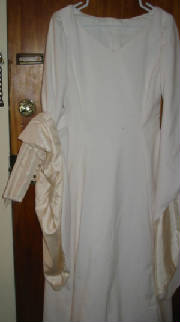
|
| Here's a closer look at the sleeves with the inner sleeve (not hemmed yet) |
Friday,
June 16th, 2006,
3:30 pm
I
got all the lining done today while watching Titanic.
Again. It took awhile, but it’s done and it looks good. I took some pictures of it as it is now and placed them on my progress
pics page. I haven’t gotten rid of all the markings
yet, but those will come out very soon. Now, I need to start the belt, do the
collar embroidery, and trim the sleeves.
Wednesday,
June 21st, 2006, 9:00
am
I’ve
been working over the past few days on my belt. I went shopping with my mom on
Saturday at stores in her town and found some trim that I think will work really well on the belt. (I also tried to find better white and gold cord—closer to film—and couldn’t find it.) I’ve been carefully hand-stitching the gold trim on and I think it looks pretty
good. I started with the hanging part of the belt in front. I have the two rows on the outside done and now I have to figure out how to do the scallop. The other thing I need to think about are the medallions on the belt.
I was thinking that I could do them with beading, but I’ll need to do some mock-ups to figure out how. I worked out through sketches some ideas, but none of them seem to work in my head with the trim that will
be on the belt. Should I put the beading on a piece of fabric, then put that
on the belt? More thinking needs to be done.
Saturday,
June 24th, 2006, evening
I
had an epiphany. While I was thinking about my belt the other day, I realized
that I have these little votive candle holders that are beaded. Around the edge
is beaded around a ring, so the beads wrap around the ring, encasing it. I figured,
why can’t I do that for the “outline” of the belt medallions, then use a single strand of beads as the little
loops on top? Then, I had to figure out how to do that. The first thing I thought of was just using thread for the loops, but then I figured I could find a fine-gauge
wire and work with that. But what to use as the ring? Well, let’s try pipe cleaners. Yep, I bought some plain
white pipe cleaners. I looked around my apartment for a guide small enough to
make a good circle, then I threaded a bunch of beads on the finest wire I could find and wrapped it around. Doesn’t look too bad. I'll keep playing and see what
happens.
| My Eowyn belt progress |
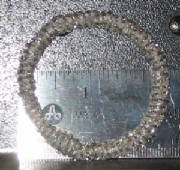
|
| Here's the beaded ring. It's wrapped around a pipe cleaner (yep...) using thin beading wire. |
Friday, July
7th, 2006, 11:30 am
I
hate it when I have epiphanies and I’ve already started on the first epiphany.
Ok, so I had another one today. I’ve been working on the previous
epiphany and it’s been going just fine. (I haven’t had much time
to work because of various trips and such.) So, today, I’m writing about
my progress in my blog and another one comes to me. What if I put the pipe cleaner
directly on the belt and attach it to the belt by beading around it….like laying it down and stitching over it with
the beads, instead of beading the circle and attaching it afterwards. I’ll
think more on it.
Sunday, July
9th, 2006, 9:45 pm
I've been working on the belt the past few days, but haven't decided to add to my
diary because it's just the same thing over and over. But, today, I've decided to let you all in on my progress by adding
pictures. I've been putting the trim on the part of the belt that hangs down
in front. I'm about a 1/4 of the way up the second side. You can see in my picture how I've been tackling this
strange thing. It's taking a long time, but I think it looks just great. I'm still thinking about the medallions,
so that progress will come later.
| My Eowyn belt progress |

|
| You can see the guide I've been using. (the red semi-circle) |
| My Eowyn belt trim |

|
| This trim is 1/8th inch wide and has flat metallic gold ribbon woven around 2 white cords. |
Tuesday,
July 11th, 2006, evening
I'm done with the trim on the front hanging tab of the belt. I need to now sew
the backing on and I have to start on the actual belt part of the belt. :) Still contemplating the medallions.
|


